Ready to take your kimono wearing to the next level? Today I’m going to show you how to make your own custom kimono padding sets using simple materials you probably already have at home. This is the same method I learned from professional kimono dressers, and I’m excited to share it with you!
- Why Make Your Own Kimono Padding?
- What You’ll Need: Essential DIY Materials
- Creating Upper Body Padding
- Hip and Lower Back Padding
- Waist Padding: Smoothing Those Curves
- Three Methods for Securing Your Padding
- Important Care and Maintenance Tips
- Getting Creative: Custom Variations and Ideas
- Why This DIY Approach Matters
- My Final Thoughts
Why Make Your Own Kimono Padding?
Before we jump into the how-to, let me tell you why creating your own padding sets is such a smart move. Once you make these reusable pieces, you can simply grab them and put them on every time you wear a kimono – no more folding towels from scratch each time! It saves time and ensures consistency in your silhouette.
What You’ll Need: Essential DIY Materials
The beauty of this project is its simplicity. Here’s your shopping list:
- Five thin hand towels – The thinner, the better for fine-tuning your fit
- Masking tape or koshihimo (waist cords) – For securing your padding
- Optional: Elastic bandage strips – My personal favorite for easy fastening
- Optional: Needle and thread or sewing machine – If you want to make permanent pieces
Why Thin Towels Are Your Best Friend
You might wonder why I keep emphasizing thin towels. It’s all about control! Thin towels let you build up padding gradually and adjust precisely to your body’s needs. Here’s a little secret from professional kimono dressers: many of them prefer well-worn, thin towels over brand-new fluffy ones. Those old bathroom towels you’re about to donate? They’re actually perfect for this project!
Creating Upper Body Padding
Chest Compression Padding (For Larger Busts)
Let me share the exact technique I learned when training to dress people for coming-of-age ceremonies. This method really works!
Step 1: Take two hand towels and lay them flat. Overlap them by about 20 centimeters (roughly 8 inches). This creates one long, continuous piece.
Step 2: Fold this double-length towel in half width-wise.
Step 3: To prevent the overlapped section from sliding apart, sew a few stitches anywhere in that overlapping area. Don’t worry about making it pretty – this stitching won’t be visible when you wear it.
Step 4: When putting it on, position the overlapped section at your back. Starting from one side, wrap the towel around your chest, pulling firmly to compress your bust. The goal is to create a flatter chest line.
Step 5: Once you’ve wrapped around once and compressed one side, slightly adjust the towel position downward and continue wrapping under the bust area for additional support.
Step 6: To secure it, either tuck the end firmly under the layers you’ve already wrapped, or tie it in place with a koshihimo.
This double-towel method provides excellent compression without feeling restrictive. You’ll be amazed at how much it smooths your silhouette!

Upper Body Padding (For Thinner Frames)
If you need to add volume to your upper torso, the approach is much simpler.
The Basic Version: Fold a hand towel in half lengthwise (so it becomes long and narrow). Put this on your upper body, positioning it to fill in the hollows of your chest and shoulders.

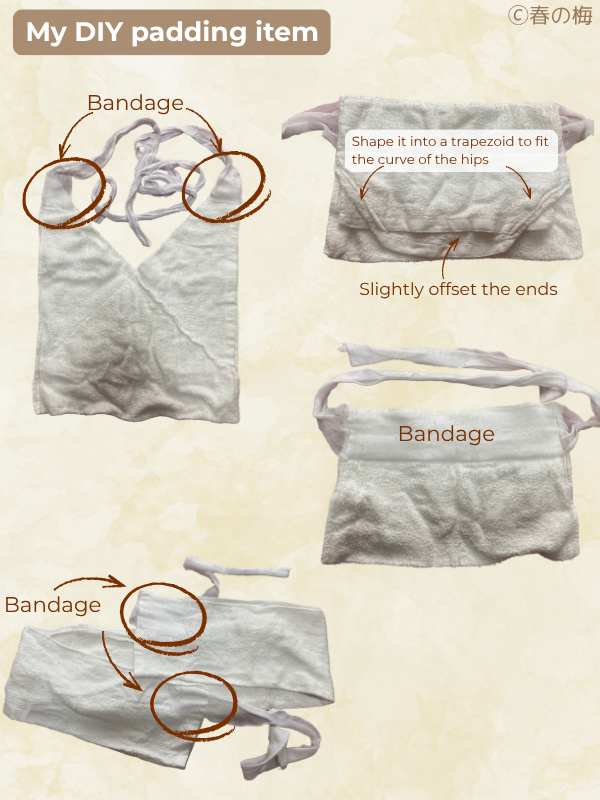
My Enhanced Version: I’ve created a custom piece that I absolutely love using. I took a towel folded lengthwise and sewed elastic bandage strips to the ends. This way, I can tie it around myself without needing an extra koshihimo. It’s a game-changer for convenience!
The elastic bandage doesn’t cut into your skin like regular cords might, and because it stretches, it stays comfortable throughout the day.
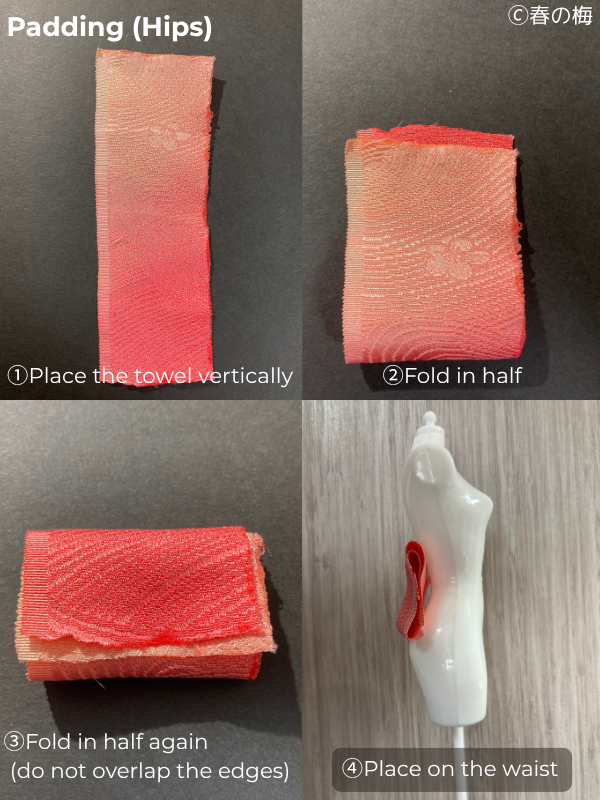
Hip and Lower Back Padding
The hip padding is beautifully simple to make:
Step 1: Take one hand towel and fold it into quarters.
Important tip: Make sure the edges don’t overlap when you fold! If they overlap, you’ll create a thick bump that will show through your kimono fabric. You want the folds to lie flat and smooth.
Step 2: If you want to make this a permanent piece (which I highly recommend), run a few stitches through the folded towel to hold its shape. I use my sewing machine for this, but hand-stitching works just fine.
Step 3: Add elastic bandage strips to the ends for easy tying. This transforms it from a simple folded towel into a professional-looking padding piece you can use again and again.
When you position this pad on your body, remember to place it so the bottom edge aligns with where your buttocks begin to curve. This creates that crucial smooth line from your lower back down.
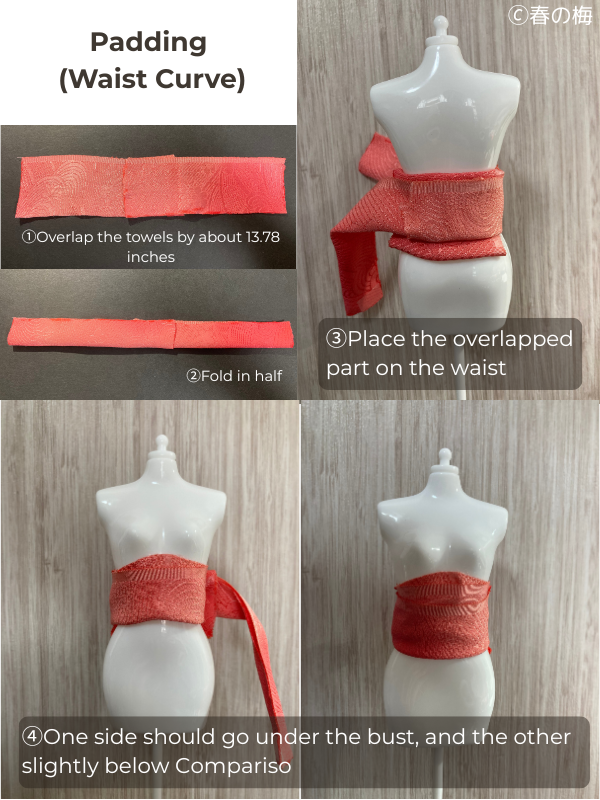
Waist Padding: Smoothing Those Curves
The waist padding is similar to the chest compression wrap, but with different measurements:
Step 1: Take two hand towels and lay them flat. Overlap them by about 35 centimeters (roughly 14 inches).
Step 2: Fold the overlapped towels in half width-wise.
Step 3: Sew a few stitches through the overlapping section to keep it secure.
Step 4: I attach elastic bandage strips to both ends of this piece. This makes it so much easier to put on by yourself!
This longer piece wraps around your waist area, filling in those curves on your sides while keeping your front relatively flat. The length ensures complete coverage without any gaps.
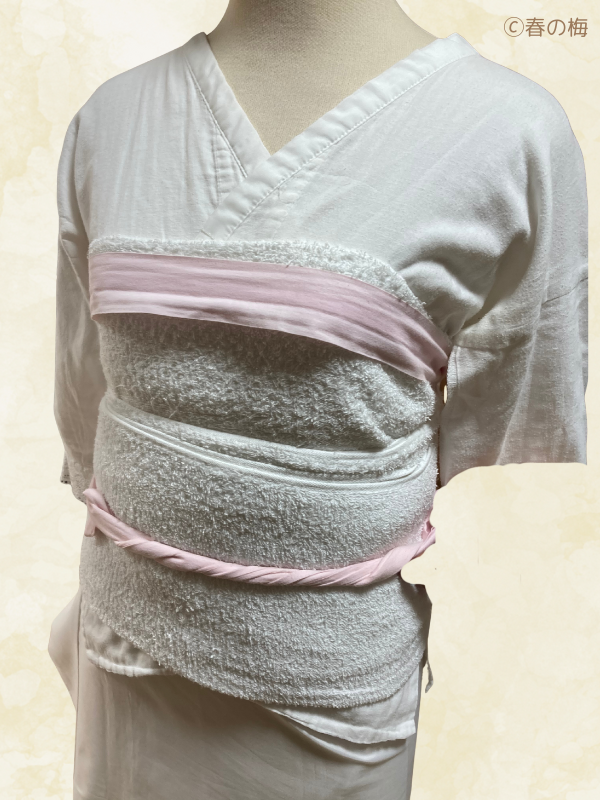
Three Methods for Securing Your Padding
Now that you’ve made your padding pieces, how do you keep them in place? You have three excellent options:
Method 1: Using Koshihimo (Traditional Waist Cords)
After positioning each padding piece on your body, tie it in place with a koshihimo. This is the most traditional method.
Keep in mind that you’ll need extra koshihimo if you use this method for all your padding. Remember, you also need koshihimo for wearing your nagajuban (under-kimono) and kimono itself – typically three cords total – plus an additional two or three for tying your obi, depending on the style you’re creating.
So if you’re securing padding with cords too, you might need several extra koshihimo. It can get a bit complicated managing so many ties!
Method 2: Sewing on Elastic Bandages (My Favorite!)
This is the method I personally use and absolutely recommend. By sewing elastic bandage strips onto your padding pieces beforehand, you eliminate the need for extra koshihimo.
Why I love this method:
- The elastic bandage is thin, so it doesn’t add bulk
- It stretches with your body, so it’s never too tight or uncomfortable
- It won’t dig into your skin like cords sometimes do
- You can tie it yourself easily without assistance
Pro tip: Use wider elastic bandages (about 5-7 centimeters wide) so they don’t cut into your skin. The wider surface area distributes pressure more comfortably.
Method 3: Masking Tape (The Quick and Easy Option)
This might surprise you, but masking tape actually works wonderfully for securing padding! It’s readily available, inexpensive, and perfect for beginners who are still experimenting.
Simply use masking tape to attach your padding pieces to your hadajuban (kimono undershirt). The tape holds everything in place throughout the day, and it removes easily afterward without leaving residue on your garments.
I haven’t personally used this method extensively, but I’ve seen it demonstrated in several instructional videos by experienced kimono wearers, and they swear by it. It’s especially convenient when you’re still in the testing phase, trying different amounts and positions of padding.
Important Care and Maintenance Tips
Your padding pieces will absorb perspiration, so choosing washable materials is crucial. Fortunately, towels are naturally easy to launder!
Here’s something I learned through trial and error: when sewing your padding pieces, keep the stitching minimal. Why? Because multiple layers of fabric sewn together take forever to dry. By limiting your stitching to just what’s necessary to hold the shape, your padding pieces will dry much faster after washing.
I wash my padding pieces after every use or two, just like I would wash any undergarment. They stay fresh and last for years with proper care.
Getting Creative: Custom Variations and Ideas
Once you understand the basic principles of making kimono padding, the possibilities for customization are endless! Let me share some creative variations I’ve encountered:
Summer Adaptations
For hot weather kimono wearing, try using mesh body towels instead of regular terry cloth. These body towels (the kind used in Japanese baths) are much more breathable and help you stay cooler. Some kimono dressers in Japan swear by this modification for summer events.
Reference:
Natural Material Alternatives
I’ve heard of kimono dressers using dried loofah (hechima in Japanese) to create hip padding! The natural fibers are breathable and create just the right amount of cushioning. How creative is that?
Mixing Towel Thicknesses
Try using slightly thicker towels just for your hip padding while keeping thinner towels for your upper body and waist. Different areas of your body need different amounts of support, so why not customize each piece?
Your Ideas Welcome!
Do you have any innovative ideas for kimono padding materials or methods? I’d absolutely love to hear about them! The kimono community thrives on sharing knowledge, and you might have a brilliant solution that others haven’t considered.
Why This DIY Approach Matters
Making your own padding sets might seem like extra work initially, but it’s truly an investment in your kimono-wearing journey. You’ll have custom pieces that fit your body perfectly, save time getting dressed, and never waste money on products that don’t quite work for you.
Plus, there’s something satisfying about creating your own kimono accessories. You’re connecting with the practical wisdom that Japanese women have developed over generations, adapting traditional techniques to modern life.
My Final Thoughts
I hope this guide empowers you to create padding sets that work beautifully for your unique body. Remember, the goal isn’t to achieve some impossible ideal – it’s to make wearing kimono more comfortable and enjoyable for you personally.
Start simple, experiment freely, and don’t be afraid to modify these instructions based on what works best for you. Every body is different, and your perfect padding solution might be slightly different from mine. That’s not just okay – it’s exactly how it should be!
If this article helped you in any way, I’d be truly delighted. Now get those old towels out and start creating! Your custom kimono padding awaits.
Happy sewing, and even happier kimono wearing!
There are other articles related to kimono padding as well, so I’d be happy if you take a look at them for reference.

コメント