
Are you fascinated by the elegant beauty of kimono but feel overwhelmed by the complex dressing process? You’re not alone! Many people dream of wearing this traditional Japanese garment but don’t know where to start.
Don’t worry – wearing a kimono might seem complicated, but it’s absolutely achievable with the right guidance. In this step-by-step kimono dressing guide, I’ll walk you through everything you need to know, from choosing the right undergarments to tying that perfect obi knot.
- What You’ll Learn in This Kimono Wearing Tutorial
- Before We Start: Essential Kimono Accessories You’ll Need
- Step 1: Start with the Foundation – Tabi Socks
- Step 2: Choose the Right Undergarments for Kimono
- Step 3: Hanjuban – Getting the Layering Right
- Step 4: Body Padding (Hōsei) – The Secret to Perfect Kimono Shape
- Step 5: Nagajuban – The Important Middle Layer
- Step 6: The Main Event – Putting on Your Kimono
- Step 7: Mastering the Obi – Your Kimono’s Finishing Touch
- Step 8: Final Details That Make the Difference
- Common Kimono Wearing Mistakes to Avoid
- What to Do When You Need More Help
- Your Kimono Journey Starts Now
What You’ll Learn in This Kimono Wearing Tutorial
By the end of this guide, you’ll understand:
- The essential items needed for kimono dressing
- How to prepare your body for the perfect kimono silhouette
- Step-by-step instructions for wearing each layer
- Pro tips for achieving that authentic look
- Common mistakes to avoid
Let’s transform you into a confident kimono wearer!
Before We Start: Essential Kimono Accessories You’ll Need
Before diving into the dressing process, make sure you have all the necessary items. For a detailed kimono accessories list, please refer this article. Here’s what you’ll need for basic kimono wearing:
Foundation Items:
- Tabi socks (split-toe socks)
- Kimono-specific bra or no bra
- Susoyoke (underskirt)
- Hanjuban (short undergarment)
- Towels for padding
- Nagajuban (long undergarment)
Securing Items:
- Koshi-himo (waist ties)
- Date-jime (stabilizing belt)
- Obi (sash)
- Obi accessories (obi-ita, obi-makura, obi-age, obi-jime)
Step 1: Start with the Foundation – Tabi Socks
Here’s your first pro tip: always put on your tabi socks first! These traditional split-toe socks have metal hooks called “hakoze” that can be tricky to fasten when you’re already dressed.
Why start with tabi? Think of it like putting on pantyhose – it’s much easier when you can bend freely. Once you’re wearing multiple layers of kimono, reaching down to fasten those tiny hooks becomes nearly impossible.
Step 2: Choose the Right Undergarments for Kimono
The Kimono Bra Dilemma Solved
Here’s something many beginners don’t know: regular bras can ruin your kimono silhouette. The traditional kimono look favors a straight, cylindrical figure rather than emphasizing curves.
Your best options:
- Wire-free bras: Comfortable and won’t dig into your ribs
- Kimono-specific bras: Designed to flatten the chest naturally (Example)
- No bra at all: Traditional choice, but only if you’re comfortable
Avoid these: Padded bras, underwire bras, or anything that creates pronounced curves.
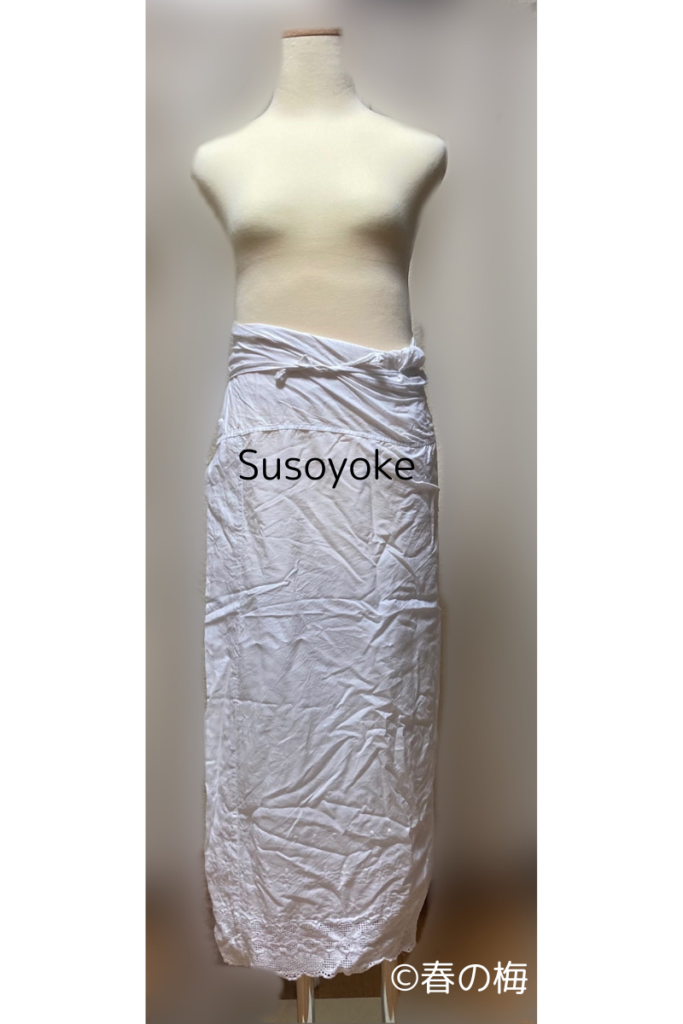
Susoyoke: Your Kimono Foundation Layer
The susoyoke is like a slip that goes under your kimono. Wrap it around your waist with the hem falling at ankle height. This creates a smooth foundation and prevents the kimono fabric from sticking to your skin.
Quick tip: The susoyoke should feel secure but not tight – you’ll be adding more layers!
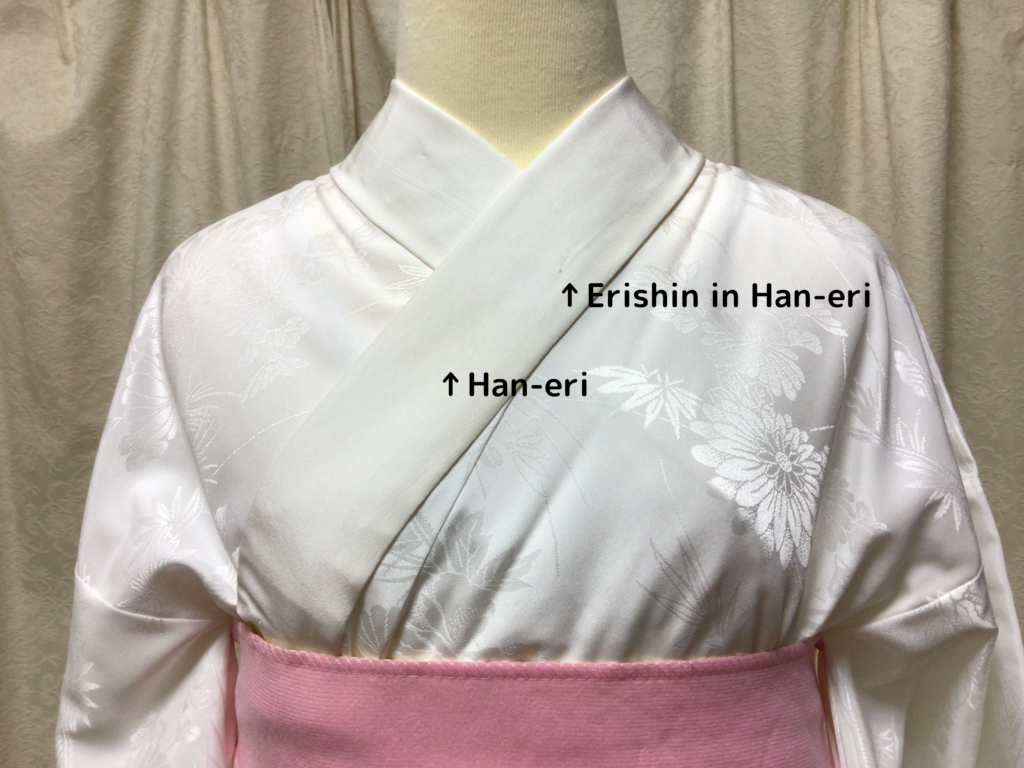
Step 3: Hanjuban – Getting the Layering Right
Now comes your first practice with the traditional kimono wrapping technique. Put on the hanjuban and cross it over your chest following the golden rule of kimono dressing:
The Universal Kimono Rule: Always cross RIGHT side underneath, LEFT side on top. This applies to every layer!
Professional technique: Pull the back fabric down slightly to prevent it from showing above your kimono collar later.

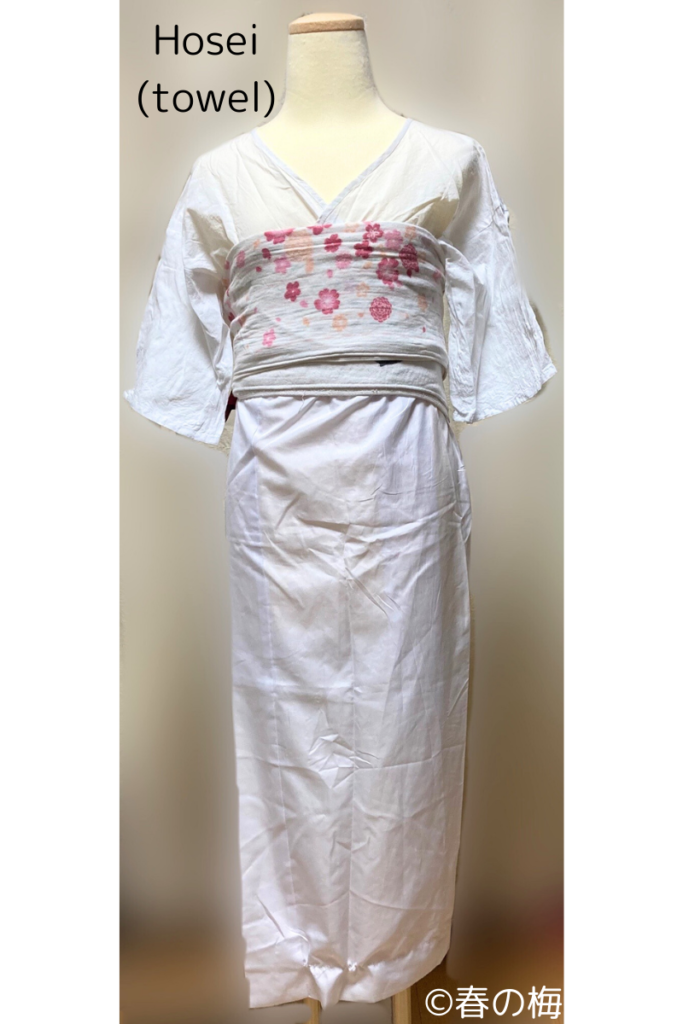
Step 4: Body Padding (Hōsei) – The Secret to Perfect Kimono Shape
This step might surprise you, but padding is essential for achieving that elegant kimono silhouette. Don’t worry – it’s not about changing your body shape drastically, just smoothing out natural curves.
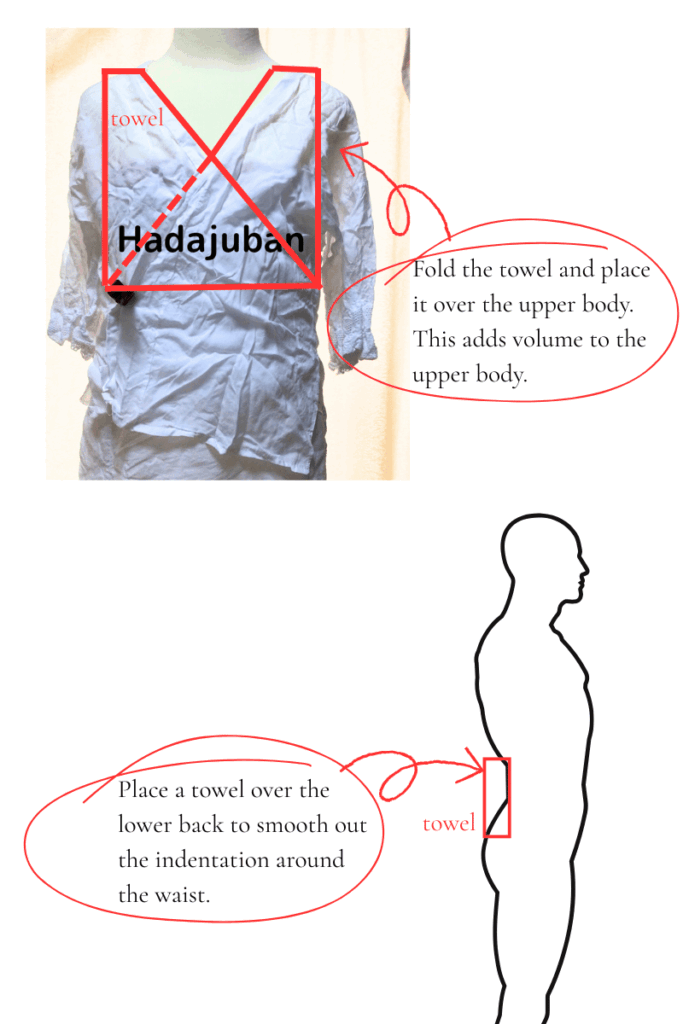
How to Pad Like a Pro
For different body types:
Slender upper body: Add towels around your chest and torso to create more volume.
Fuller chest: Use towels to gently flatten and create a straighter line.
Defined waist: Wrap towels around your middle to minimize the waist indentation.
Hip curves: Place towels strategically to create a straight line from chest to hips.
Think of it like this: You’re creating a gentle, elegant cylinder that allows the kimono fabric to fall beautifully without clinging to curves.
Step 5: Nagajuban – The Important Middle Layer
The nagajuban is crucial for formal kimono wearing (skip this step for casual yukata in summer).
Choosing Your Nagajuban Material
Silk nagajuban: Feels luxurious and molds beautifully to your body, but requires careful maintenance.
Polyester nagajuban: Easy to wash and care for, though slightly more slippery than silk.
Nagajuban Style Options
Traditional one-piece: Classic choice for formal occasions.
Two-piece sets: Easier to put on and adjust.
Proper Nagajuban Positioning
Once you put on the nagajuban, focus on these key points:
- Both sides of your chest should be neatly covered
- The back neckline (emon) should be pulled out properly
- The center seam should run straight down your spine
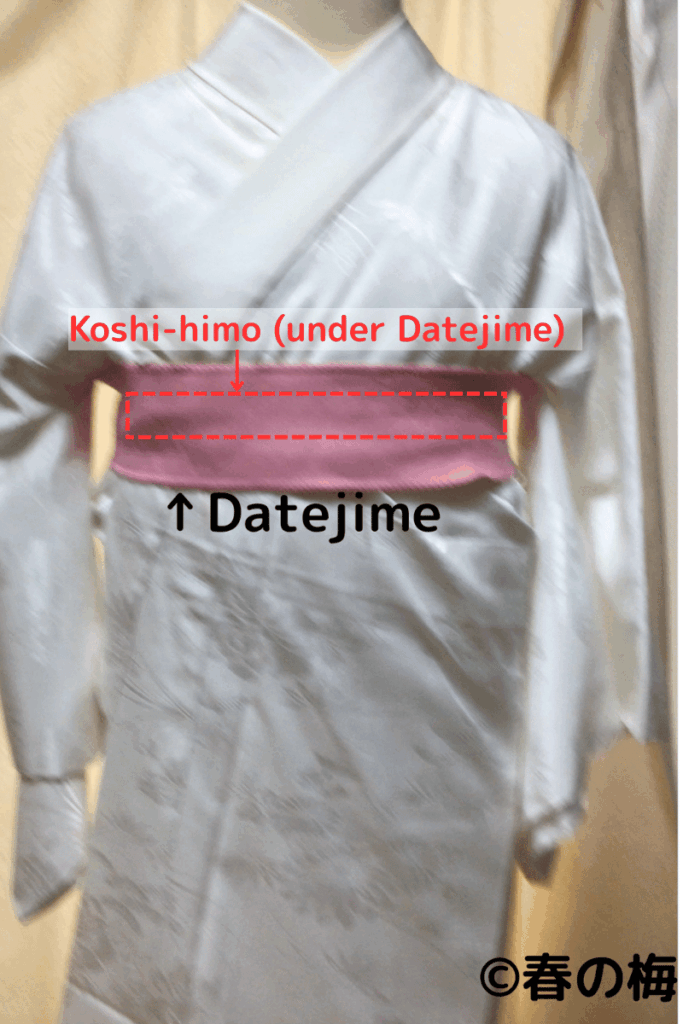
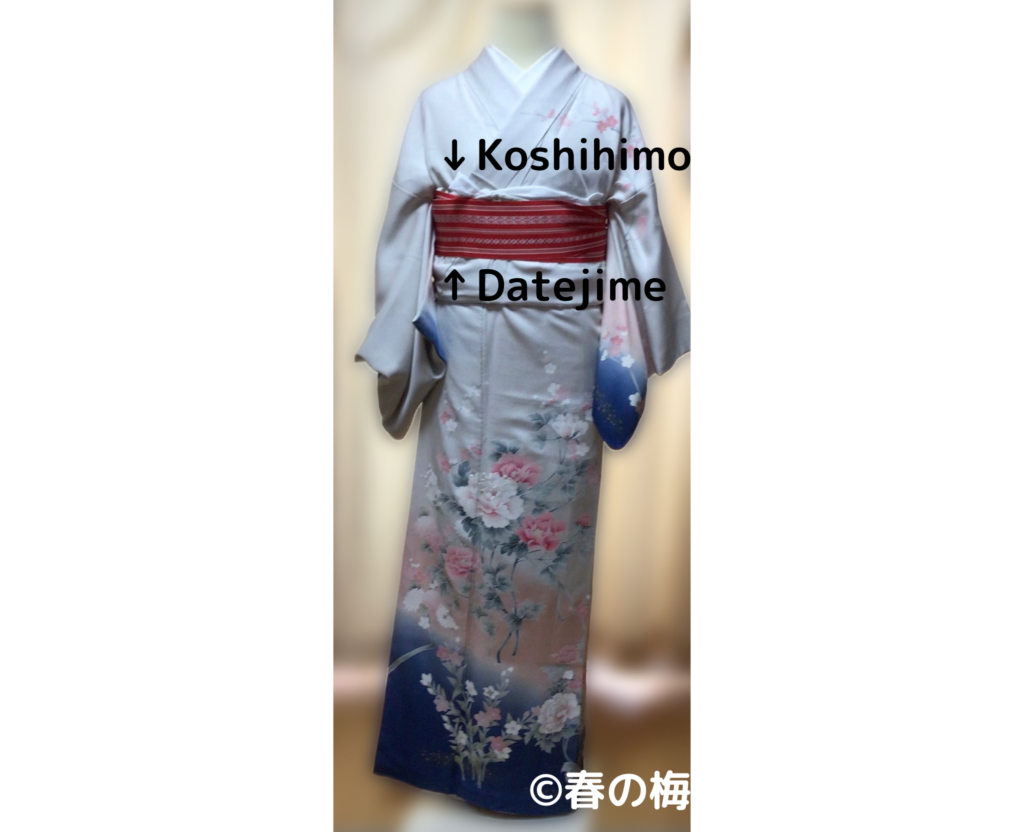
Secure with a koshi-himo around your chest, then add a date-jime for extra stability.
Step 6: The Main Event – Putting on Your Kimono
Now for the moment you’ve been waiting for – wearing the actual kimono!
Getting the Hemline Perfect
First, determine where you want the hem to fall (typically at ankle height). Hold the kimono at this length and secure it with a koshi-himo around your waist. Make this tie snug – it prevents everything from sliding down later.
Collar and Chest Positioning
Next, adjust the collar position. The kimono collar should sit nicely against your neck without gaping. Cross the fabric over your chest (remember: right under, left over!) and secure with another koshi-himo.
Add a date-jime to keep everything stable and smooth out the ohashori (the folded part of the kimono around your waist).
Step 7: Mastering the Obi – Your Kimono’s Finishing Touch
The obi is like a wide belt that completes your kimono look. There are many obi tying styles, but we’ll focus on the classic otaiko (drum) knot using a Nagoya obi.
Before Tying Your Obi
If your obi-ita (stiffening board) has an elastic band, put it on first. This creates a smooth foundation for your obi.
Creating the Otaiko Knot
The otaiko is the most common obi knot for everyday kimono wearing. While the technique requires practice, the result is worth it – you’ll have that authentic, elegant kimono silhouette.
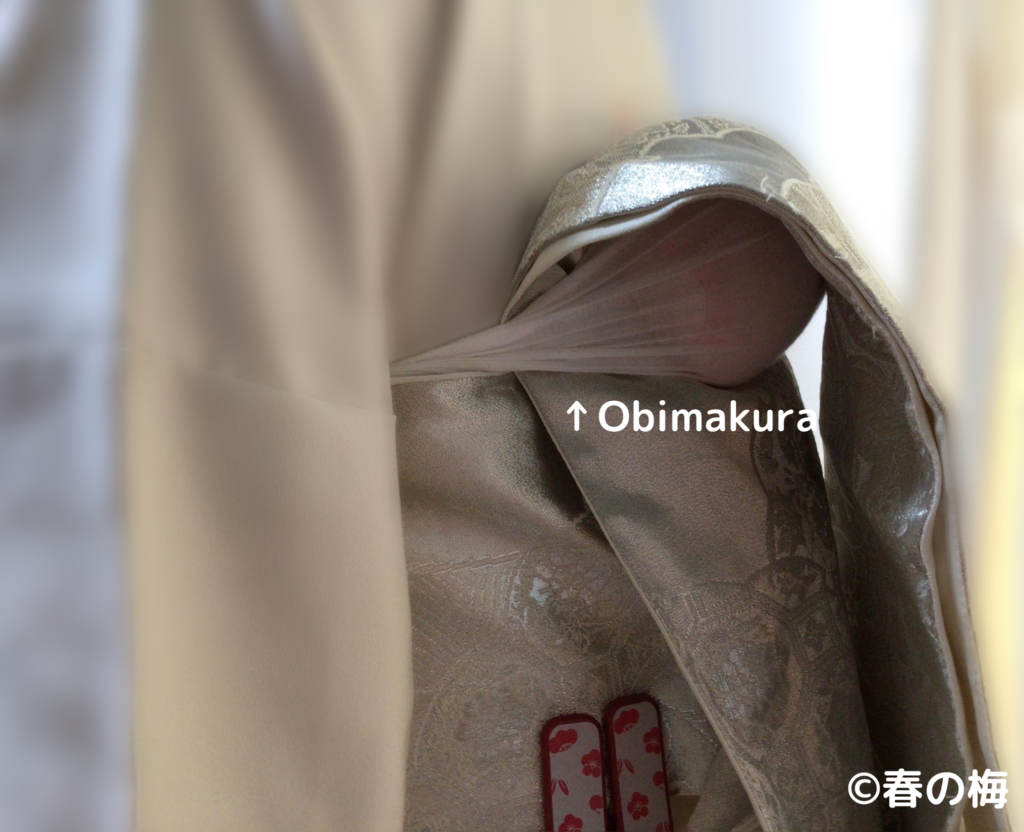
Essential accessories for obi tying:
- Obi-makura: A small pillow that creates the knot’s shape
- Obi-age: A silk cord that covers the obi-makura
- Obi-jime: A decorative cord that secures everything
Step 8: Final Details That Make the Difference
Obi-age and Obi-jime
The obi-age wraps around your obi-makura and tucks neatly into the obi. The obi-jime ties around your waist over the obi, keeping everything secure.
Pro tip: The obi-jime should be tight enough to hold everything in place, but not so tight that it’s uncomfortable.

Adding Your Zori Sandals
Finally, slip on your zori sandals, and you’re ready to step out in style!
Common Kimono Wearing Mistakes to Avoid
- Wrong crossing direction: Always remember – right under, left over
- Loose ties: Better slightly too tight than too loose
- Uneven hemlines: Take time to adjust before securing
- Ignoring the collar gap: The back collar should show some neck
- Rushing the process: Good kimono dressing takes time and patience
What to Do When You Need More Help
This guide covers the basics of kimono wearing, but remember – kimono dressing is an art that improves with practice. If you’re visual learner, YouTube has excellent kimono dressing tutorials from experienced practitioners.
Feeling stuck? Don’t hesitate to:
- Watch multiple video tutorials
- Practice with a friend
- Consider taking a kimono dressing class (if available)
- Join online kimono communities for support (if available)
Your Kimono Journey Starts Now
Congratulations! You now have a complete roadmap for wearing kimono. Remember, every expert was once a beginner, and the most important step is simply starting.
The beauty of kimono lies not just in the final look, but in the mindful process of dressing. Each layer, each tie, each adjustment is part of a centuries-old tradition that connects you to Japanese culture and craftsmanship.
Ready to begin? Gather your items, set aside plenty of time for your first attempt, and remember – practice makes perfect. Soon, you’ll be dressing in kimono with confidence and grace.
Your journey into the beautiful world of kimono starts with that first step. Why not take it today?


コメント